A GUIDE TO
UNDERSTANDING
GUITAR "THEORY" ©
LESSON ELEVEN:
Putting at least some
of what you've learned together in musical examples. :-)
For this exercise you will need to learn a few
rules.
(Use the chart below as a guide to
beginning proper fingering.)
Start on the LOWEST bass note (in this
example "G").
Use LOGICAL fingering for ascending and
descending advances.
Use the "DOT to DOT" Theory
(Lessons 1 and 2) to "locate" the name of
starting notes.
Use the reference guide for SCALES
(Lesson 6) to learn the note
names as you learn these modes. (It may take longer to learn at
first, but you'll OWN
a lifetime of KNOWING what you're playing if you do.)
Don't always
play "triplets" (i.e., counting 3 notes
followed by 3 notes.. or, 1-2-3, 1-2-3, 1-2-3, etc.,). Try COUNTING in groups of 4,
accenting the ONE of each 4 notes played (i.e., 1-2-3-4,
1-2-3-4, etc., across ALL strings). It may feel
AWKWARD at first having to count even numbers on odd
strings, but it's WELL worth the effort. Occasionally
triplets will be desired, but even then use them
SPARINGLY !! Eventually, counts of 2 or 5 or more should
be experimented with as well.
And lastly, whenever
crossing "G & B" string combinations, it
will USUALLY require an advance UP one (#) frets
(though sometimes more depending on the MODE) when
ascending, and an advance DOWN one fret (b)
(sometimes more) when descending (this is due to the
nature of the TUNING of the guitar).
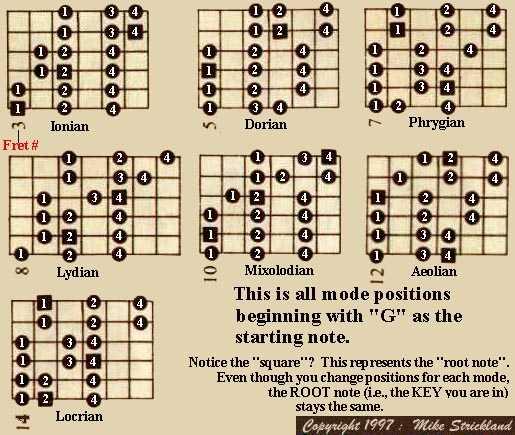
Let's try the following IONIAN scale. This
"mode" has an easy way to "group" the
fingerings as you can see... with only 3
(similar) patterns being incorporated while grouping 2 strings at a time.
Starting with the 6th string, play the 1st 3 notes, then move to the
5th string repeating the same pattern. This is the first
grouping.
Continue working each "set" of
strings till you reach the last group. This is the 3
pattern/groups mentioned above. It's easier to play than to
explain, so whip out your axe and follow the changes, making
sure to (at least TRY) naming each note as described above.
| |
|
 |
| S |
1 |
| T |
2 |
| R |
3 |
| I |
4 |
| N |
5 |
| G |
6 |
| #'s |
|
| |
|
| |
|
Below is a COMPLETE
Mode chart (still in the key of "G"). The neat thing
about this particular "system" of learning is that the
"positions" are MOVABLE. If you've followed the lessons
faithfuly up to this point, it shouldn't be to hard to
"transpose" into any key.
(If your guitar neck
does NOT go up this far, as in the case of MOST acoustic
guitars, you must find the correct fret combination in a LOWER position, then work up from there. Just
remember which NOTE you should be playing and move
accordingly. EXAMPLE: The 14th fret F#
would be found at the 2nd fret, the 12th fret E would
also have to include some OPEN notes, etc., JUST FOLLOW THE
INTERVAL'S RULES !)
* ALSO *
Just remember the following rule when
transposing into other KEYS.. find the ROOT note, then:
Whole step, Whole step, half step, Whole step,
Whole step, Whole step, half step.
This just means MOVE YOUR INDEX FINGER up 2 frets.. or 1 fret at a time
(depending on the MODE in question ), starting with whatever ROOT
note (key) YOU want to begin with.
-----
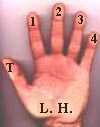
The HAND
Finger Names and
Numbers
(In case you DON'T know)
| The Left hand... |
 |
T |
| 1 |
| 2 |
| 3 |
| 4 |
"T" stands for Thumb.. the rest
should be obvious.
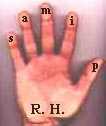
| The Right hand.. |
 |
p |
| i |
| m |
| a |
| s |
Although Mel Bay's Guitar
Class Method book (©Mel Bay
Publications) provides the
following definition for Right hand: P
= Pulgar, I
= Indicio, M
= Medio, A
= Anular, S
= (no name provided), I have an
easier way to remember this (I believe :).
P
|
= Plectrum
|
I
|
= Index
|
M
|
= Middle
|
A
|
= After (middle)
|
S
|
= Small
|
If you are LEFT handed,
just reverse these patterns to correspond with the proper
fingering, the rest of this information will remain the same.
----
AND LASTLY... (for
the free lessons anyway)
PENTATONICS
This exercise will
explain an EASY way to play PENTATONIC Scales.
There are only 5 basic rules to
learn:
Remember this
pattern and you'll be playing them with ease in no time !!.
Count while ascending
by starting on ONE string saying the numbers: "1
- 2 - 3", then switch to the NEXT string saying "4
- 5". (Reverse this pattern when
descending, i.e., 5 - 4, switch
strings, then 3 - 2 - 1).
Use only your 1st
and 3rd fingers. (This way you reduce the amount
of "finger memory" required to learn these
PENTATONIC Scales.)
Always SLIDE
with your 3rd finger regardless of the direction (i.e.,
ascending or descending).
ALL INTERVALS are 2
frets apart. The exception to this rule is the
EXTENSIONS (as shown in the diagrams below).
DO NOT COUNT EXTENSIONS as part of the
"COUNTING" rule. Just PLAY THEM, DON'T SAY
THEM. If you must say anything, just say the NAME of
the note you are playing.
I grouped the RED notes together as
a visual aid to make this concept easier to grasp.
All information and diagrams © 1998 Mike
Strickland
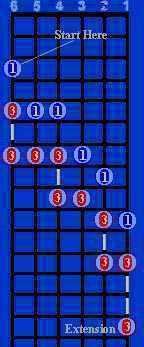 |
This scale will work on most COUNTRY and
RHYTHM & BLUES
lead runs.
(The white line between the
"3" represents
the "SLIDE".)
This is the "Extension".
<-------
|
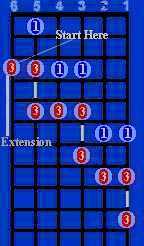 |
This scale will work on most BLUES and
ROCK & ROLL
leads runs.
|
This IS a movable
scale !!
THAT'S ALL !
NOTE:
I hope you've enjoyed these lessons and that they've helped you
in some way. If you have learned even something,
please tell your friends to visit.
Regardless of
whether you continue with THEORY studies or not, always make time
to practice at least ONCE a day for a few minutes. And...
remember, practice DOES NOT make perfect, only PERFECT PRACTICE
makes perfect.

Back to Lessons Archive
